
The document covers several important aspects of developing, deploying, and managing a NestJS application:
1. Logging: Using the built-in Logger class for various logging levels.
2. Error tracking: Integrating Sentry for advanced error monitoring.
3. Environment variables: Using cross-env and @nestjs/config for managing configurations.
4. Database configuration: Asynchronously reading environment variables for database setup.
5. Deployment: Steps for deploying to Heroku, including database setup and configuration.
6. CI/CD: Using GitHub Actions for continuous integration and deployment.
7. Frontend deployment: Brief mention of deploying the frontend to GitHub Pages.
Essay: Streamlining NestJS Application Development and Deployment
NestJS has emerged as a powerful framework for building scalable and efficient server-side applications with Node.js. As applications grow in complexity, developers need robust tools and practices to manage, monitor, and deploy their projects effectively. This essay explores key aspects of NestJS application development and deployment, highlighting best practices and tools that can significantly improve the development workflow.
One of the fundamental aspects of maintaining a healthy application is proper logging. NestJS provides a built-in Logger class that allows developers to log messages at various levels of severity. By incorporating structured logging throughout the application, developers can gain valuable insights into application behavior, troubleshoot issues more effectively, and monitor performance in production environments.
For more advanced error tracking and monitoring, integrating a service like Sentry can provide real-time error reporting and detailed diagnostics. This allows developers to quickly identify and resolve issues in production, improving overall application reliability and user experience.
Managing application configurations across different environments is crucial for maintaining a flexible and secure deployment process. The @nestjs/config package, combined with environment-specific .env files, offers a clean and efficient way to handle configuration variables. This approach allows developers to easily switch between development, staging, and production environments without hard-coding sensitive information.
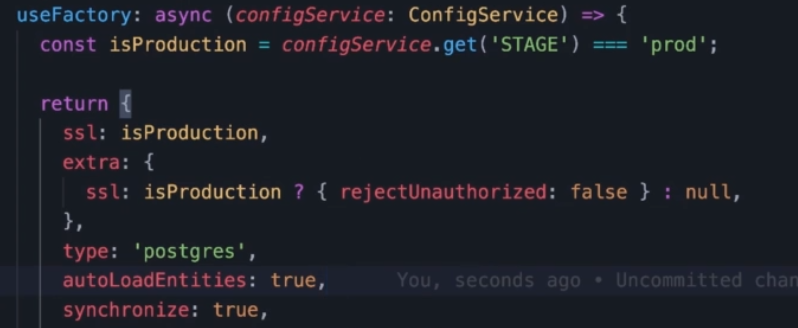
When it comes to database configuration, NestJS’s modular architecture shines. By using TypeORM with asynchronous configuration, developers can dynamically set up database connections based on environment variables. This flexibility is particularly useful when deploying to different environments or cloud platforms.
Deploying a NestJS application to a cloud platform like Heroku involves several steps, from setting up a database to configuring environment variables. The document outlines a straightforward process for deploying to Heroku, including commands for creating a PostgreSQL database, setting environment variables, and pushing code to the Heroku repository. This deployment strategy provides a solid foundation for getting a NestJS application up and running in a production environment.
To further streamline the deployment process, incorporating continuous integration and deployment (CI/CD) practices using GitHub Actions can automate testing and deployment tasks. This approach ensures that code changes are automatically tested and deployed, reducing the likelihood of human error and increasing the speed of development iterations.
Add logger
main.ts
const logger = new Logger();
logger.log(`Application listening on port 3000`);
Define in controller
export class TasksController {
  private logger = new Logger('TasksController');
Using in controller
this.logger.verbose(
  `User "${user.username}" retrieving all tasks. Filters: ${JSON.stringify(filterDto)}`,
);
Using in repository
try {
  const tasks = await query.getMany();
  return tasks;
} catch (error) {
  this.logger.error(
    `Failed to get tasks for user "${user.username}". Filters: ${JSON.stringify(filterDto)}`,
    error.stack,
  );
}
Nest.js plus sentry
Environment Variables
yarn global add cross-envconsole.log(process.env);npm_package_jest_testRegex: '.*\\.spec\\.ts$', npm_package_devDependencies_ts_node: '^10.9.1',
npm_package_devDependencies__types_supertest: '^6.0.0', npm_package_devDependencies__types_node:
'^20.3.1', npm_package_dependencies__nestjs_platform_express: '^10.0.0',Add Configuration
yarn add @nestjs/configapp.module.ts
ConfigModule.forRoot({
  envFilePath: [`.env.stage.${process.env.STAGE}`],
}),
add .env files

package.json
{
  "start:dev": "STAGE=dev nest start --watch",
  "start:debug": "STAGE=dev nest start --debug --watch",
  "start:prod": "STAGE=prod node dist/main",
  "lint": "eslint \"{src,apps,libs,test}/**/*.ts\" --fix",
  "test": "STAGE=dev jest"
}
Use .env configuration in Controller
controller
constructor(    private tasksService: TasksService,    private configService: ConfigService,  ) {
console.log(configService.get('DATABASE_HOST'));  }
tasks.module.ts
@Module({
  imports: [ConfigModule, TypeOrmModule.forFeature([Task]), AuthModule], controllers:
  [TasksController], providers: [TasksService, TaskRepository],
})
Async Read .env
app.module.ts
@Module({
  imports: [ConfigModule.forRoot({
    envFilePath: [`.env.stage.${process.env.STAGE}`],
  }), // Add ConfigModule to the imports array ConfigModule, TypeOrmModule.forRootAsync({
    imports: [ConfigModule], inject: [ConfigService], useFactory: async (configService:
    ConfigService) => ({
      type: 'postgres', host: configService.get('DB_HOST'), port:
      parseInt(configService.get('DB_PORT')), username: configService.get('DB_USER'), password:
      configService.get('DB_PASS'), database: configService.get('DB_DATABASE'), autoLoadEntities:
      true, synchronize: false,
    }),
  }), TasksModule, AuthModule,],
})
Deployment
Heroku command
yarn global add herokuCheck heroku
heroku -vLogin heroku
keroku loginMake Database
heroku addons:create heroku-postgresql:hobby-dev -a name_applicationAdd SSL connection
Push on heruko
heroku git:remote -a name_applicationConfiguration
heroku config:set NPM_CONFIG_PRODUCTION=falseheroku config:Set NODE_ENV=productionheroku config:set DB_HOST=...heroku config:set DB_PORT=5432heroku config:set DB_USERNAME=...heroku
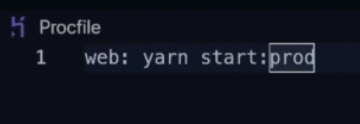
config:set DB_PASSWORD=...heroku config:set DB_DATABASE=...heroku config:set JWT_SECRECT=...Add Procfile in root folder of project
Deploy
git push -f heroku HEAD:masterLogs
heroku logs --tailGithub action
Deploying Your NestJS Application to a Cloud Server (AWS, Azure, Digital Ocean)with GitHub Actions — The Easy and Saving Cost Way.
Deploy front end on github
https://github.com/arielweinberger/task-management-frontend/blob/master/.github/workflows/deploy.yml