This comprehensive guide provides a step-by-step walkthrough for setting up a fully functional Ubuntu development environment from scratch. Whether you’re a developer, system administrator, or power user, this document covers everything from essential system updates and networking configuration to installing professional development tools and optimizing your workflow.
The guide begins with fundamental system maintenance tasks, including package updates and DNS configuration, which form the foundation of a stable system. It then progresses through installing popular development tools such as Go, Visual Studio Code, Docker, and linting tools like golangci-lint. Beyond development utilities, you’ll find instructions for productivity applications, communication platforms, and system optimization techniques.
A key section focuses on configuring DNSMasq for advanced DNS management, enabling split-DNS capabilities that allow you to route different domains through custom DNS servers — a particularly useful feature for managing multiple network environments or accessing region-specific services. The guide also covers network security setup with SSH keys, VPN connectivity through OpenConnect, and performance monitoring tools.
Here is the list of configurations mentioned in this article:
The article covers system-level configurations, including Ubuntu package updates and installation of the fix-broken dependencies tool. Network configuration is extensively detailed through DNS setup via /etc/resolv.conf, followed by advanced DNSMasq configuration for split-DNS routing with custom nameservers for specific domains. Firefox settings adjustments are mentioned for DNS preferences, while OpenConnect configuration includes SSL certificate extraction using OpenSSL commands for VPN connectivity.
Development environment configurations involve setting up Golang with PATH exports and GOPATH definitions in bashrc, along with Visual Studio Code settings for golangci-lint integration with specific linting flags. System service management includes enabling and disabling systemd-resolved, restarting DNSMasq services, and checking unit file status through systemctl commands. Security configurations encompass SSH key setup procedures and file permissions management using chattr commands to make /etc/resolv.conf immutable.
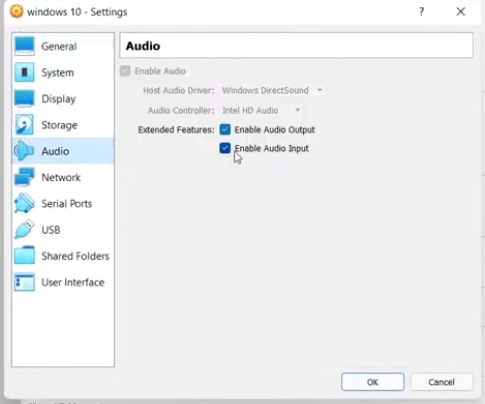
Performance and logging configurations feature DNSMasq log file creation at /var/log/dnsmasq.log with query logging enabled, along with cache size optimization settings. Virtual machine configurations address VirtualBox kernel module issues, Windows VM screen resolution adjustments, and audio input enablement. Storage optimization includes swap size increase procedures, while monitoring configurations involve htop setup and iotop installation for system resource tracking. Additional configurations cover desktop environment customization through Bing wallpaper integration, calendar extension setup, and SafeEyes configuration for break reminders during extended work sessions.
Update Ubuntu
sudo
apt update
sudo
apt install -f
Install Telegram
sudo snap install telegram-desktopSet DNS
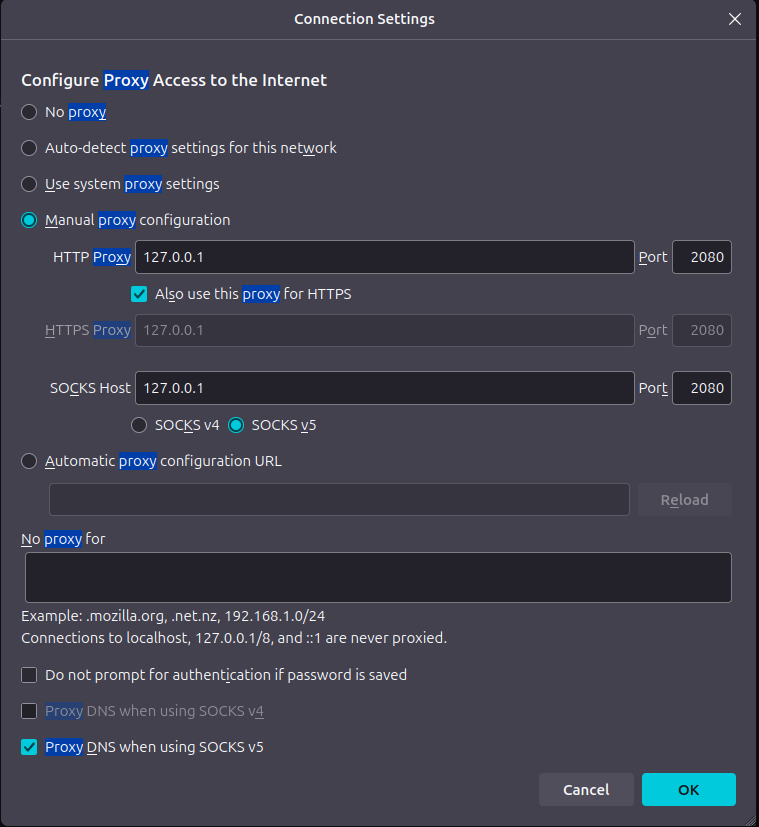
sudo vi /etc/resolv.confnameserver 10.202.10.10nameserver 10.202.10.11Set in Firefox settings
Insomnia
sudo snap install insomniaInstall htop
sudo
apt  install htop
Postman
sudo snap install postmanProxychains
sudo
apt-get install proxychains
sudo gedit/etc/proxychains.conf
curl icanhazip.com
LiberOffice
sudo
apt install libreoffice
Gedit
sudo
apt install geditsudo
apt install dbus-x11Install DNSMASQ
sudo add-apt-repository universe
sudo
apt install software-properties-common
sudo
apt install dnsmasqdnsmasq --versionDnsmasq version 2.90 Copyright (c) 2000-2024 Simon KelleyCompile time options:
IPv6 GNU-getopt DBus no-UBus i18n IDN2 DHCP DHCPv6 no-Lua TFTP conntrack ipset nftset auth
cryptohash DNSSEC loop-detect inotify dumpfileThis software comes with ABSOLUTELY NO WARRANTY.Dnsmasq is free software, and you are welcome to
redistribute itunder the terms of the GNU General Public License, version 2 or 3.Check running
systemctl list-unit-files | grep dnsmasqMake a log file
sudo touch /var/log/dnsmasq.logsudo gedit /etc/dnsmasq.d/99-split-dns.conf
# Listen only on loopbackinterface=lobind-interfaceslisten-address=127.0.0.1# Special DNS for specific
domainsserver=/mysite.ir/1.1.1.1server=/youtube.com/4.4.4.4server=/shecan.ir/178.22.122.101server=/ir/1.1.1.1# Default DNS (Shecan)server=178.22.122.101# Security & behaviordomain-neededbogus-privno-resolvno-poll# Performancecache-size=1000# Logging (optional — logs go to journal/syslog by
default)log-querieslog-facility=/var/log/dnsmasq.logCheck config syntax (optional but helpful)
sudo dnsmasq --testdnsmasq: syntax check OK.Restart DNSMasq
sudo systemctl restart dnsmasqEnsure /etc/resolv.conf uses 127.0.0.1
cat /etc/resolv.confIt should contain:
nameserver 127.0.0.1If it shows 127.0.0.53 (systemd-resolved) or something else:
# Stop and disable systemd-resolved
sudo systemctl stop systemd-resolved
sudo systemctl disable
systemd-resolved# Replace resolv.confecho "nameserver 127.0.0.1" |
sudo tee /etc/resolv.confRemove the symlink and create a static /etc/resolv.conf
# Remove the symlink
sudo rm /etc/resolv.conf# Create a new static file with DNSMasq as the resolverecho "nameserver 127.0.0.1" | sudo tee
/etc/resolv.conf(Recommended) Lock the file to prevent overwrites
Many services (NetworkManager, cloud-init, and DHCP clients) will try to restore the symlink.
Make it immutable:
sudo chattr +i /etc/resolv.conf🔒 To edit it later:
sudo chattr -i /etc/resolv.conf✅ Verify the fix
cat /etc/resolv.conf
cat /var/log/dnsmasq.log
Dig DNS
dig @127.0.0.1 datadriveninvestor.com
sudo tail -f /var/log/dnsmasq.log
sudo cat
/etc/dnsmasq.d/99-split-dns.conf
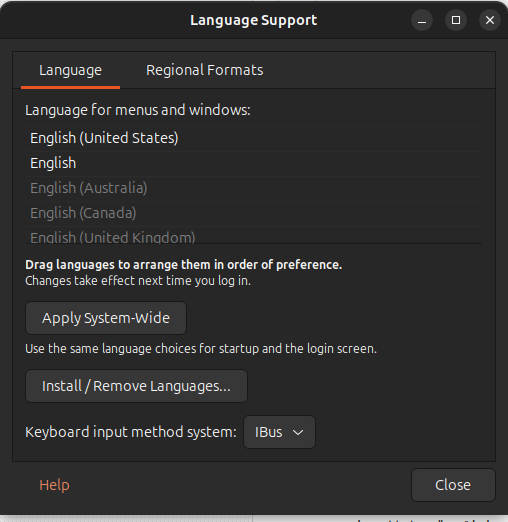
Install Language
Install Golang
rm -rf /usr/local/go && tar -C /usr/local -xzf go1.25.3.linux-amd64.tar.gzexport PATH=$PATH:/usr/local/go/bingo versionAdd to bashrc
# Go installation path
export PATH=$PATH:/usr/local/go/bin# Set GOPATH explicitly (optional but clearer)
export GOPATH=$HOME/go# Add Go workspace bin to PATH
export PATH=$PATH:$GOPATH/binsource ~/.bashrcMake a folder
mkdir $HOME/go/src
mkdir $HOME/go/pkg
mkdir $HOME/go/bin
How to Set Up SSH Keys on Ubuntu 22.04
Vscode
Safe Eye
Protect Your Eyes From Eye Strain
SafeEyes is a simple, beautiful, and extensible break reminder that helps prevent eye strain when working long hours at the computer.
sudo
apt install safeeyes
Install Chrome
sudo dpkg -i google-chrome-stable_current_amd64.debGolangci-lint
Golangci-lint is a fast linters runner for Gois a fast linters runner for Go
# Install to $(go env GOPATH)/bin (common and recommended)
curl -sSfL
https://raw.githubusercontent.com/golangci/golangci-lint/master/install.sh | sh -s -- -b $(go env
GOPATH)/bin v1.59.1golangci-lint --versionOpen your workspace or user settings.json
{
  "go.lintTool": "golangci-lint",
  "go.lintOnSave": "file",
  "go.lintFlags": [
    "--fast"
  ]
}
Docker
https://www.arvancloud.ir/fa/dev/docker
Install tools
sudo
apt install calc
sudo
apt-get install unrar
sudo
apt-get install iotop
sudo
apt-get install vim
sudo
apt-get install curl
sudo
apt-get install build-essential
sudo snap install vlc
sudo
apt install net-tools
Change the background with Bing wallpaper
sudo snap install bing-wallInstall Shamsi Calendar Extension
sudo apt install gnome-shell-extensions
https://extensions.gnome.org/extension/240/persian-calendar/Open connect
sudo
apt-get install openconnect network-manager-openconnect network-manager-openconnect-gnomeopenssl pkcs12 -in user.pfx -out exported.pem -nokeysopenssl pkcs12 -in user.pfx -out exported.key
-nocerts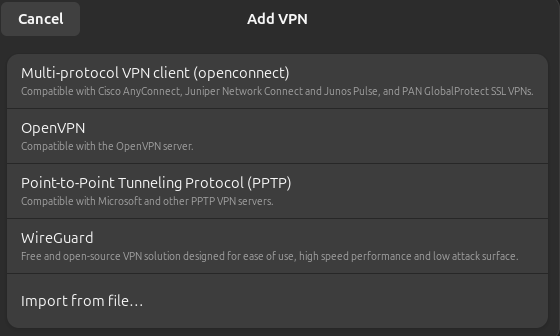
Increase swap size
Install SonarQube
PGAdmin 4
Install Node.js ≥ v20 using NodeSource
Follow these steps to install a supported version:
1. Install required dependencies
sudo
apt update
sudo
apt install -y ca-certificates
curl gnupg
2. Add NodeSource repository (for Node.js 22.x)
curl -fsSL https://deb.nodesource.com/setup_22.x |
sudo -E bash -
3. Install Node.js
sudo
apt install -y nodejs
4. Verify installation
node --versionnpm --versionwhich node
/usr/bin/nodeThen in VS Code settings.json:
{
  "sonarlint.pathToNodeExecutable": "/usr/bin/node"
}
Install Windows as a virtual machine (VM) on Ubuntu 22.04
1. Install VirtualBox
sudo
apt update
sudo
apt install virtualbox virtualbox-ext-pack -y2
⚠️ Problem 1: VirtualBox kernel module not loaded
sudo
apt --fix-broken install
2. Download Windows ISO
Go to Microsoft’s official page:
👉 https://www.microsoft.com/software-download/windows10
or
👉 https://www.microsoft.com/software-download/windows11
Save the .iso file (e.g., Win11_English_x64.iso).
3. Install Windows
4. How to change screen resolution in VirtualBox Windows 11 VM
5. enable input audio
Concultion
This comprehensive Ubuntu setup guide provides a complete roadmap for transforming a fresh installation into a robust, professionally configured development environment by systematically addressing system updates, network configurations, security protocols, and development tool installations. The article demonstrates that proper system configuration extends beyond simply installing applications, with critical elements such as DNS management through DNSMasq, SSH key security implementation, and firewall setup through Proxychains, creating a secure and reliable computing environment. The inclusion of development tools like Golang, Docker, and Visual Studio Code, combined with productivity applications and system monitoring utilities, ensures users have everything necessary for both professional development and daily operations. The guide emphasizes the importance of system maintenance and optimization, including swap size management, eye strain prevention through SafeEyes, and performance monitoring with htop and iotop, while the ability to run Windows as a virtual machine through VirtualBox adds versatility for cross-platform work. By following this guide methodically, users not only configure their systems efficiently but also gain practical knowledge about Linux system administration, networking, development workflows, and best practices for maintaining a secure and performant computing environment. Whether you are a beginner setting up your first development machine or an experienced administrator optimizing your workflow, this guide serves as a valuable reference for creating a personalized, fully functional Ubuntu setup tailored to your specific needs and preferences.